
by Tiwari Academy Team
Exploring Some Geometric Themes Class 8 Maths Solutions: Ganita Prakash Part 2 Chapter 4, involve more drawing than calculating, so each sketch below comes with a short note on why it works. The first theme is fractals, self-similar shapes such as the Sierpinski carpet, the Sierpinski triangle and the Koch snowflake.
NCERT Class 8 Maths Ganita Prakash Part 2 Chapter 4 Solutions
In Ganita Prakash Part 2 Ch 4, you count their (the Sierpinski triangle and the Koch snowflake) holes and sides and work out area and perimeter at the nth step. The second theme is visualising solids: folding nets into cubes, cones and octahedrons, tracing an ant’s shortest path to a laddu on a cuboid and drawing front, top, side and isometric views.
Get here the Solutions and Answers of Figure it Out at Page 72.
Page 72 – Figure it Out
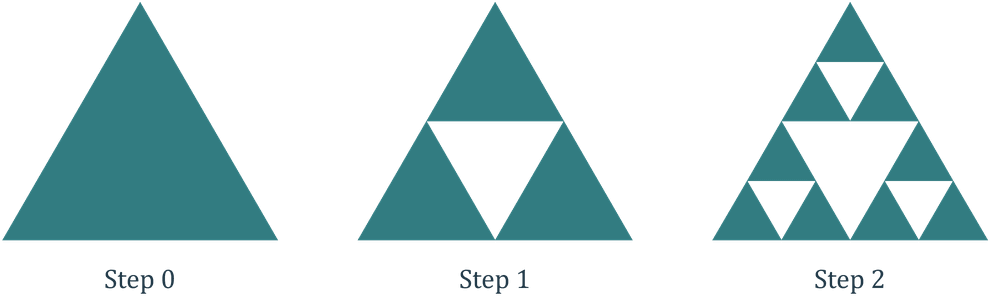
1. Draw the initial few steps (at least till Step 2) of the shape sequence that leads to the Sierpinski Triangle.
Answer:
Step 0: Draw an equilateral triangle.
Step 1: Join the midpoints of its sides to form 4 equal equilateral triangles. Remove the middle triangle.
Step 2: Repeat the same process in each of the 3 remaining triangles.
2. Find the number of holes, and the triangles that remain at each step of the shape sequence that leads to the Sierpinski Triangle.
Answer:
At each new step, every remaining triangle gives 3 smaller triangles and 1 new hole. All the old holes remain.
- Step 0: Remaining triangles = 1; holes = 0.
- Step 1: Remaining triangles = 3; holes = 1.
- Step 2: Remaining triangles = 3 × 3 = 9; holes = 1 + 3 = 4.
- Step 3: Remaining triangles = 3 × 9 = 27; holes = 4 + 9 = 13.
- Step 4: Remaining triangles = 3 × 27 = 81; holes = 13 + 27 = 40.
Therefore, the number of remaining triangles at Step n is 3ⁿ.
For n ≥ 1, the number of holes is
Hₙ = 1 + 3 + 3² + ⋯ + 3ⁿ⁻¹.
Multiplying by 3,
3Hₙ = 3 + 3² + ⋯ + 3ⁿ.
Subtracting the first sum from the second,
2Hₙ = 3ⁿ − 1.
Therefore, the number of holes at Step n is (3ⁿ − 1)/2.
This also gives 0 holes at Step 0.
3. Find the area of the region remaining at the nth step in each of the shape sequences that lead to the Sierpinski fractals. Take the area of the starting square/triangle to be 1 sq. unit.
Answer:
(i) Sierpinski Carpet
At each step, 1 out of 9 equal parts of every remaining square is removed.
So, 8/9 of the previous area remains.
- Area at Step 0 = 1 sq. unit.
- Area at Step 1 = 8/9 sq. unit.
- Area at Step 2 = 8/9 × 8/9 = (8/9)² sq. unit.
Therefore, the area remaining at Step n = (8/9)ⁿ sq. unit.
(ii) Sierpinski Triangle
At each step, 1 out of 4 equal parts of every remaining triangle is removed.
So, 3/4 of the previous area remains.
- Area at Step 0 = 1 sq. unit.
- Area at Step 1 = 3/4 sq. unit.
- Area at Step 2 = 3/4 × 3/4 = (3/4)² sq. unit.
Therefore, the area remaining at Step n = (3/4)ⁿ sq. unit.
Get here the Solutions and Answers of Figure it Out at Page 73.
Page 73 – Figure it Out
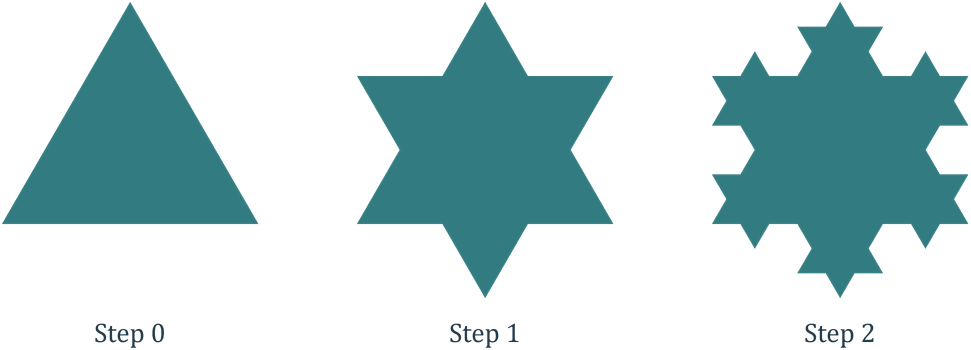
1. Draw the initial few steps (at least till Step 2) of the shape sequence that leads to the Koch Snowflake.
Answer:
- Step 0: Draw an equilateral triangle.
- Step 1: Divide each side into 3 equal parts. Draw an outward equilateral triangle on the middle part and remove that middle part.
- Step 2: Repeat this process on each side of the new figure.
2. Find the number of sides in the nth step of the shape sequence that leads to the Koch Snowflake.
Answer:
At each step, every side is replaced by 4 smaller sides.
- Number of sides at Step 0 = 3.
- Number of sides at Step 1 = 3 × 4 = 12.
- Number of sides at Step 2 = 3 × 4 × 4 = 48.
- Number of sides at Step 3 = 3 × 4 × 4 × 4 = 192.
Therefore, the number of sides at Step n = 3 × 4ⁿ.
3. Find the perimeter of the shape at the nth step of the sequence. Take the starting equilateral triangle to have a sidelength of 1 unit.
Answer:
At each new step, each side becomes 1/3 as long and the number of sides becomes 4 times as many.
At Step n,
Number of sides = 3 × 4ⁿ.
Length of each side = (1/3)ⁿ unit.
Perimeter = Number of sides × Length of each side
= 3 × 4ⁿ × (1/3)ⁿ
= 3 × (4/3)ⁿ units.
Therefore, the perimeter at Step n is 3 × (4/3)ⁿ units.
For example,
Perimeter at Step 0 = 3 units.
Perimeter at Step 1 = 4 units.
Perimeter at Step 2 = 16/3 units.
Get here the Solutions and Answers of Figure it Out at Page 80.
Page 80 – Figure it Out
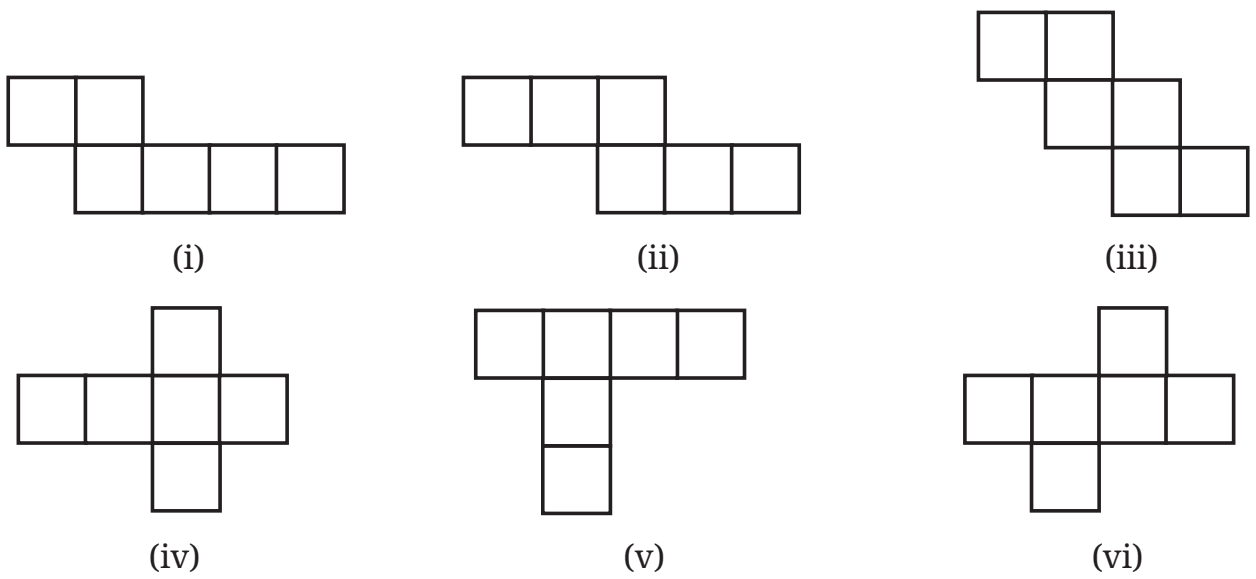
1. Which of the following are the nets of a cube? First, try to answer by visualisation. Then, you may use cutouts and try.
Answer:
The figures (ii), (iii), (iv) and (vi) are nets of a cube.
Each can fold into 6 faces without any overlap.
The figures (i) and (v) are not nets of a cube. On folding them, two squares overlap, leaving one face uncovered.
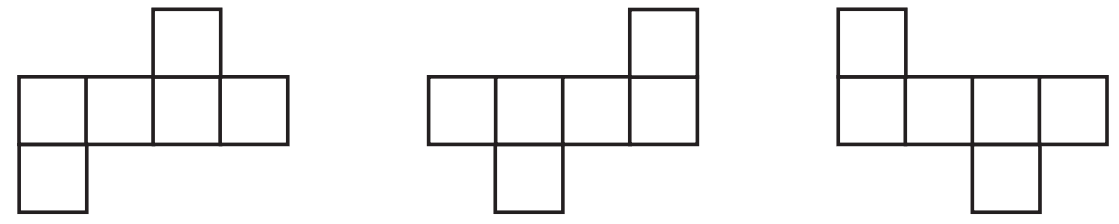
2. A cube has 11 possible net structures in total. In this count, two nets are considered the same if one can be obtained from the other by a rotation or a flip.
For example, the following nets are all considered the same –
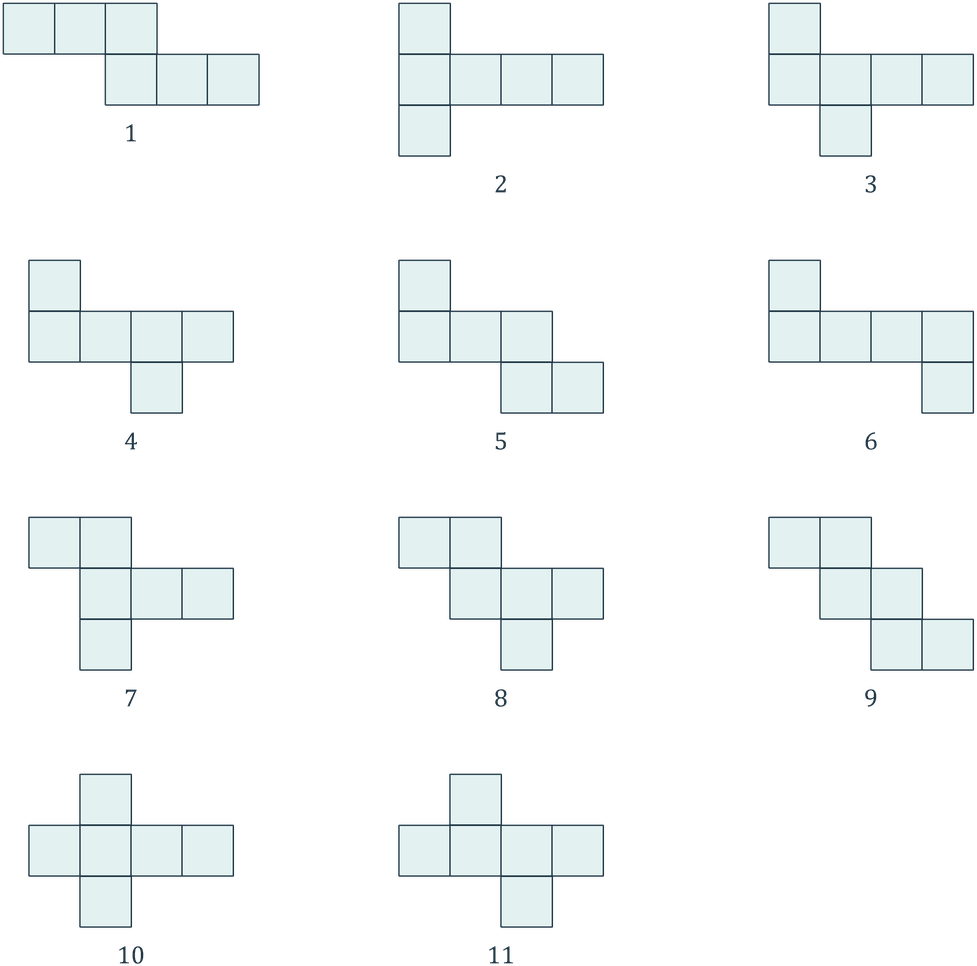
Find all the 11 nets of a cube.
Answer:
The 11 different nets are shown below.
Each net has 6 equal squares. On folding, these squares form the 6 faces of a cube.
3. Draw a net of a cuboid having sidelengths:
(i) 5 cm, 3 cm, and 1 cm
(ii) 6 cm, 3 cm, and 2 cm
Answer:
(i) The cuboid has 3 pairs of equal rectangular faces:
2 faces of 5 cm × 3 cm,
2 faces of 5 cm × 1 cm, and
2 faces of 3 cm × 1 cm.
Draw a strip of four rectangles with dimensions 5 cm × 1 cm, 3 cm × 1 cm, 5 cm × 1 cm, and 3 cm × 1 cm, joined along their 1 cm sides. Attach a 5 cm × 3 cm rectangle to each of the two 5 cm edges of the first rectangle.
(ii) The cuboid has 3 pairs of equal rectangular faces:
2 faces of 6 cm × 3 cm,
2 faces of 6 cm × 2 cm, and
2 faces of 3 cm × 2 cm.
Draw a strip of four rectangles with dimensions 6 cm × 2 cm, 3 cm × 2 cm, 6 cm × 2 cm, and 3 cm × 2 cm, joined along their 2 cm sides. Attach a 6 cm × 3 cm rectangle to each of the two 6 cm edges of the first rectangle.
The two nets are shown below:

Get here the Solutions and Answers of Figure it Out at Page 92.
Page 92 – Figure it Out
1. Observe the front view, top view and side view of the different lines in Fig. 4.6. Is there any relation between their lengths?

Answer:
The front views of all three lines have the same length. As the side-view length increases, the top-view length also increases.
Let the front-view length be a, the side-view length be b and the top-view length be c.
The front and side lengths form two perpendicular sides of a right-angled triangle.
Its hypotenuse has the top-view length.
So, c² = a² + b².
Thus, (Top-view length)² = (Front-view length)² + (Side-view length)².
For the first line, the side view is a point. Its length is 0, so the front and top views have equal lengths.
2. Find the front view, top view and side view of each of the following solids, fixing its orientation with respect to the vertical, horizontal and side planes: cube, cuboid, parallelepiped, cylinder, cone, prism, and pyramid. If needed, see the next problem for clues.
Answer:
The views depend on how we place the solid. I have chosen the following positions.
(i) Cube: Keep one face on the horizontal plane and another face parallel to the front plane.
Front view: Square.
Top view: Square.
Side view: Square.
(ii) Cuboid: Keep its length, breadth and height along the three viewing directions.
Front view: Rectangle showing length and height.
Top view: Rectangle showing length and breadth.
Side view: Rectangle showing breadth and height.
(iii) Parallelepiped: Choose a solid with a parallelogram base and vertical side edges. Keep the base on the horizontal plane, with one pair of its edges parallel to the front plane.
Front view: Rectangle.
Top view: Parallelogram.
Side view: Rectangle.
(iv) Cylinder: Keep its circular base on the horizontal plane.
Front view: Rectangle.
Top view: Circle.
Side view: Rectangle.
(v) Cone: Keep its circular base on the horizontal plane, with its vertex directly above the centre.
Front view: Triangle.
Top view: Circle.
Side view: Triangle.
(vi) Prism: Choose a triangular prism. Keep one rectangular face on the horizontal plane and a triangular end parallel to the front plane.
Front view: Triangle.
Top view: Rectangle.
Side view: Rectangle.
(vii) Pyramid: Choose a square pyramid. Keep its square base on the horizontal plane, with the vertex directly above the centre and one base edge parallel to the front plane.
Front view: Triangle.
Top view: Square.
Side view: Triangle.

3. Match each of the following objects with its projections.

Answer:
Number the pictures in each projection column from 1 to 8, starting at the top.

Get here the Solutions and Answers of Figure it Out at Page 95.
Page 95 – Figure it Out
1. Draw the top view, front view and the side view of each of the following combinations of identical cubes.

Answer:
I have numbered the solids (i) to (vi), going from left to right in each row.
In each top view below, the front edge is at the bottom. In each side view, the front is on the left. Each small square shows one cube face.

(i) Top view: An L made of 3 squares.
Front view: 2 squares in a horizontal row.
Side view: 2 squares in a horizontal row.
(ii) Top view: An L made of 3 squares.
Front view: Two columns of heights 1 and 2 squares, from left to right.
Side view: Two columns of heights 1 and 2 squares, from front to back.
(iii) Top view: An L made of 4 squares.
Front view: 3 squares in a horizontal row.
Side view: 2 squares in a horizontal row.
(iv) Top view: A 3 × 3 square.
Front view: Three columns of heights 3, 3 and 2 squares.
Side view: Three columns of heights 1, 1 and 3 squares, from front to back.
(v) Top view: 2 squares in a horizontal row.
Front view: A vertical row of 3 squares, with one square attached to the right of the middle square.
Side view: 3 squares in a vertical row.
(vi) Top view: A 3 × 3 square with the front-right square missing.
Front view: Three columns of heights 3, 2 and 3 squares.
Side view: Three columns of heights 1, 1 and 3 squares, from front to back.
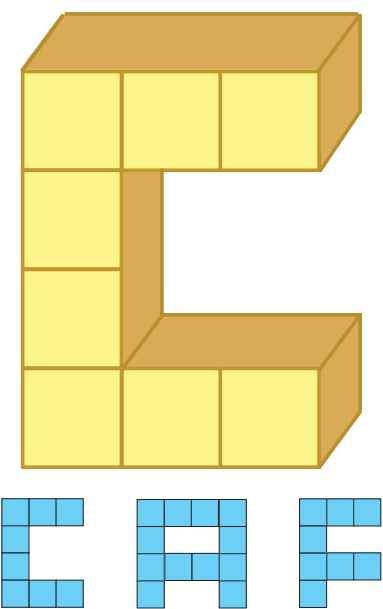
2. Imagine eight identical cubes, glued together along faces to form the letter ‘C’.
(i) This looks like a ‘C’ from the front. What does it look like from the side? From the top?
(ii) Glue additional cubes to make a shape that looks like ‘C’ from the front and ‘A’ from the top.
(iii) Now, can you glue even more cubes to make it look like ‘C’ from the front, ‘A’ from the top, and ‘F’ from the side?
(iv) Can you think of other letter combinations to make with a single combination of cubes in this manner?
Answer:
(i) From the side, it looks like a vertical strip of 4 squares.
From the top, it looks like a horizontal strip of 3 squares.
(ii) One possible construction is shown in the layer diagrams below. Layer 1 is the bottom layer and Layer 4 is the top layer. A shaded square shows where a cube is placed.
For this construction, the front edge is at the top of each layer diagram and of the top view. In the side view, the front is on the left. Left and right in the construction steps are judged while looking at the front.
First, add one cube to the end of each horizontal arm of C. Each arm now has 4 cubes.
Then extend the top layer backwards to form A:
Front row: 4 cubes.
Second row: A cube at each end.
Third row: 4 cubes.
Back row: A cube at each end.
Keep the two middle layers with only one cube at the front-left corner. Keep the bottom layer as a row of 4 cubes at the front.
This uses 18 cubes in all. It looks like C from the front and A from the top.
(iii) Yes. Add 3 cubes behind the front-left cube in Layer 2, making a row of 4 cubes from front to back.
The front view remains C and the top view remains A. The side view now becomes F.
This construction uses 18 + 3 = 21 cubes.
The arms of C and F are longer in this construction, but their letter shapes remain the same.
(iv) We can also make a solid that looks like T from the front, top and side.
Make a horizontal T using 5 cubes: 3 cubes in one row and 2 more cubes extending from the middle cube. This gives a line of 3 cubes along the stem.
Attach 2 cubes, one below the other, below the middle cube of this line. The solid uses 7 cubes and gives T in all three views.

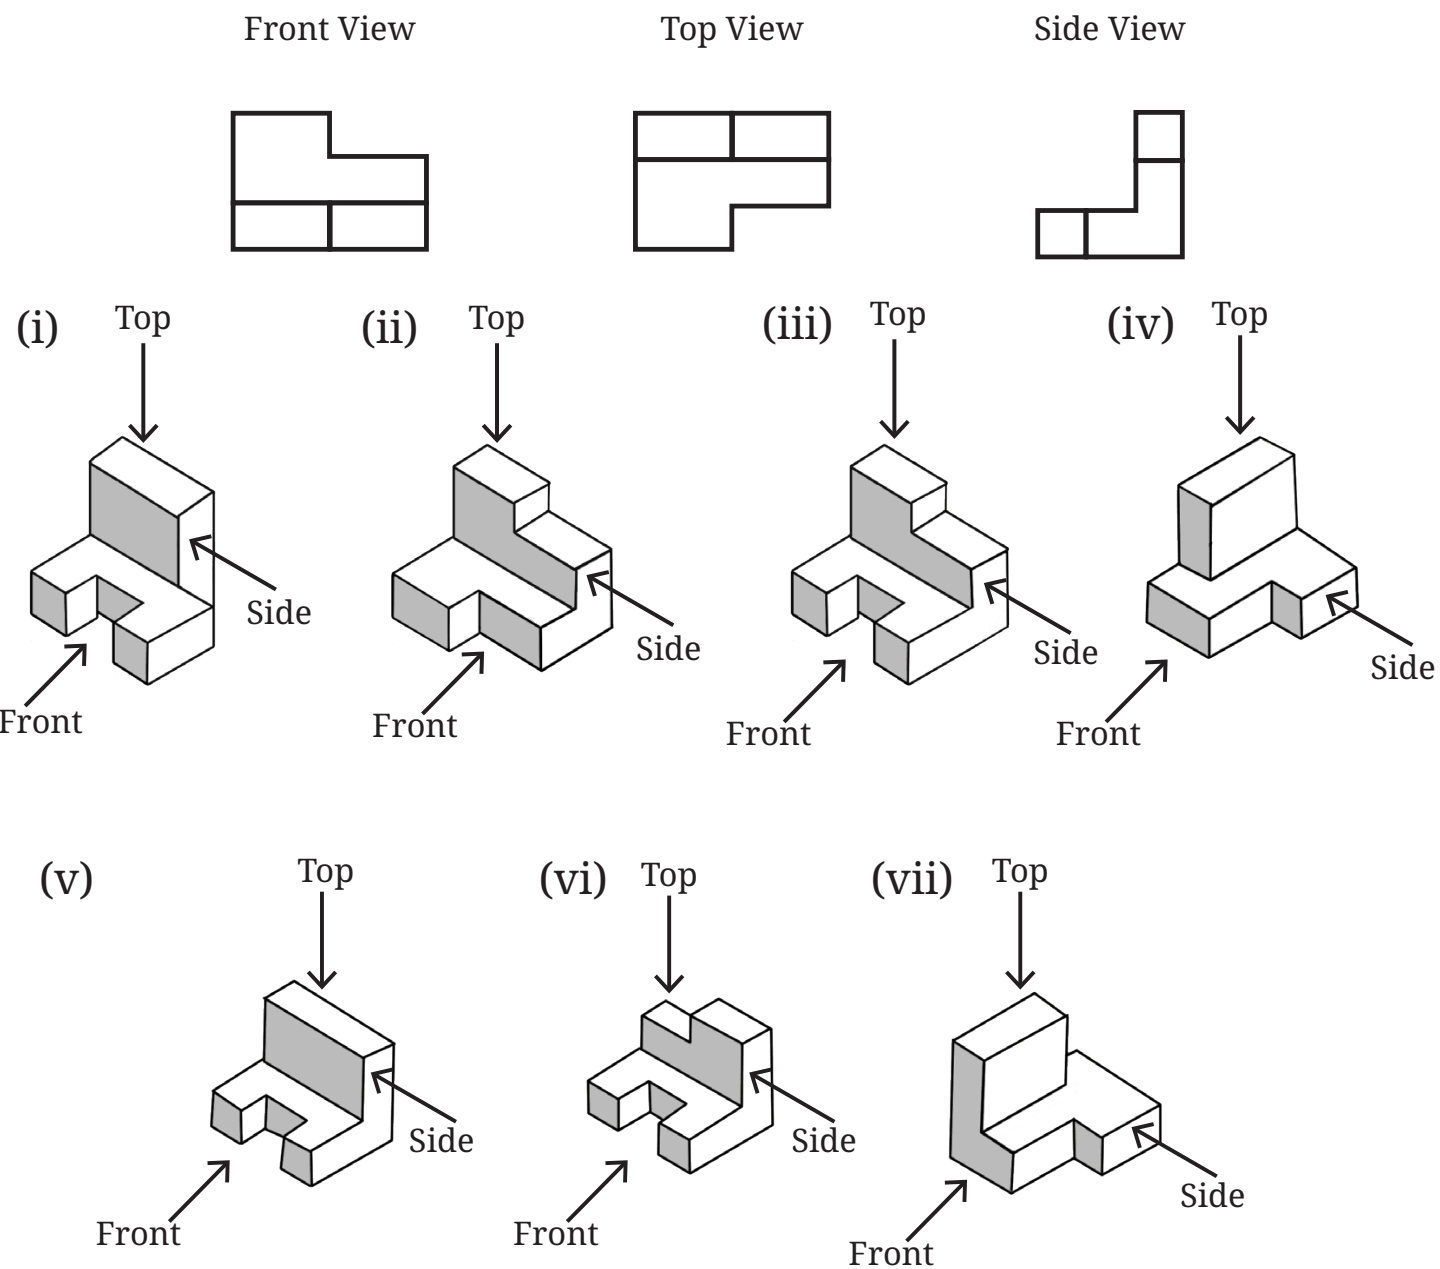
3. Which solid corresponds to the given top view, front view, and side view?
Answer:
The correct solid is (ii).
Its top view has the required L-shaped outline. Its front view has column heights 3 and 2, from left to right. Its side view has column heights 1, 1 and 3, from front to back.
Thus, all three views match.
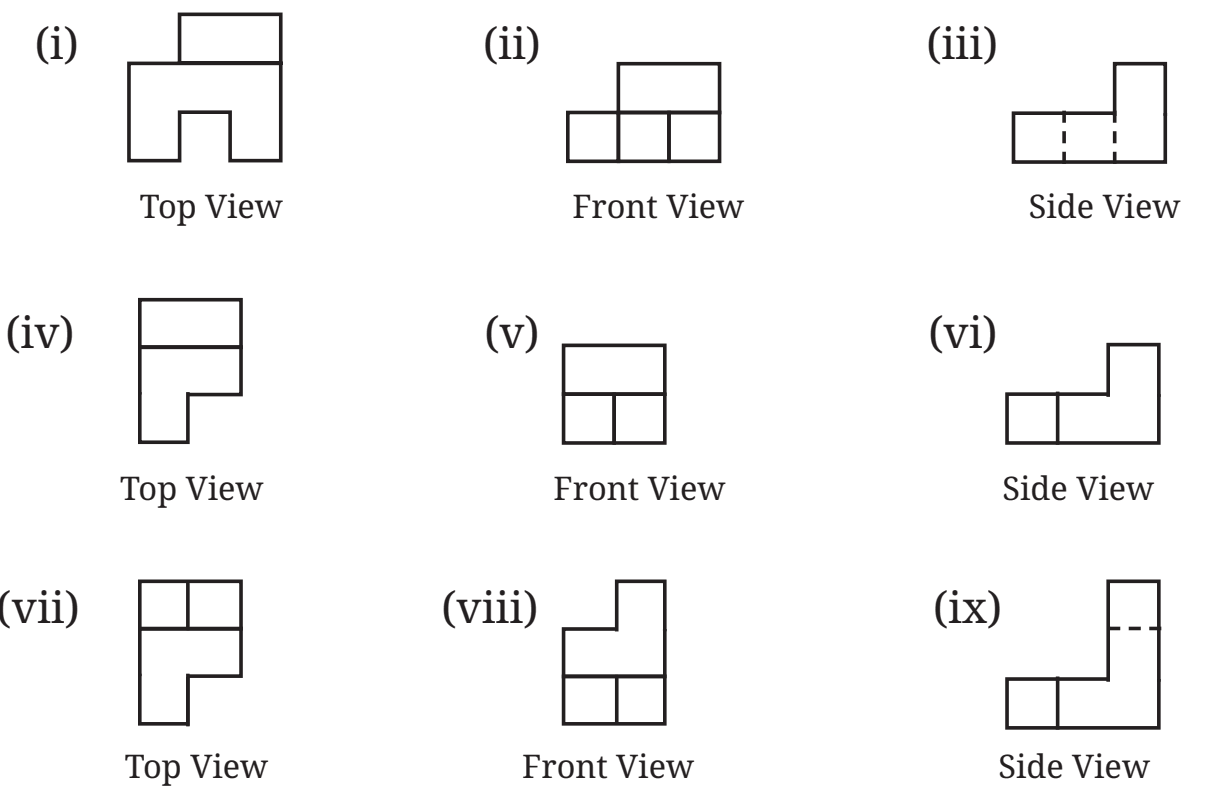
4. Using identical cubes, make a solid that gives the following projections.
Answer:
One possible solid for each group is shown below.
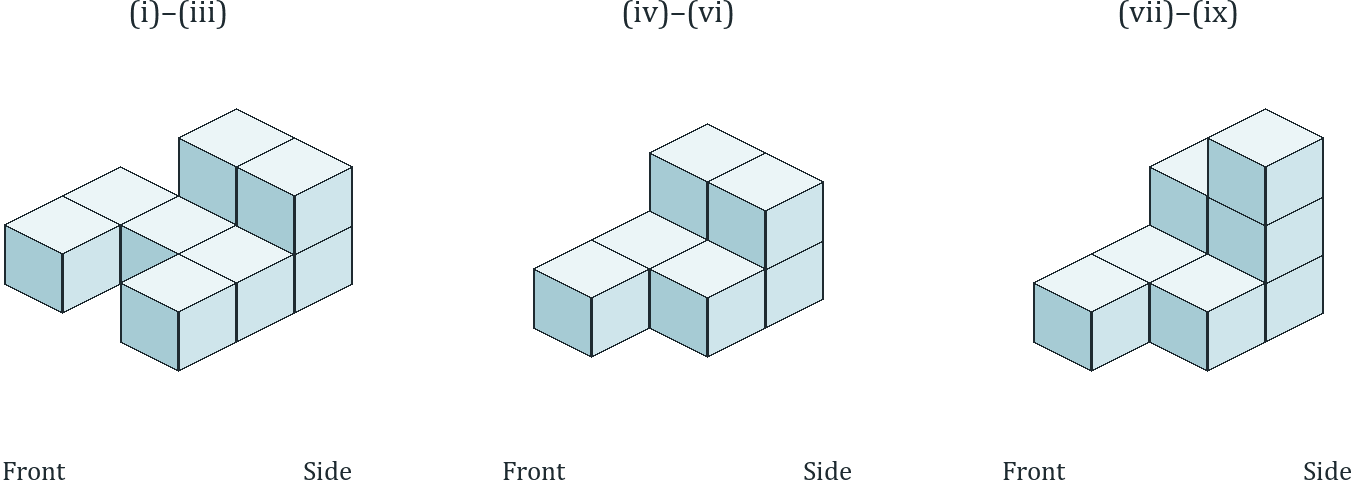
For views (i), (ii) and (iii):
Make the bottom layer with 3 rows.
Front row: Place a cube at the left and right positions, leaving the middle position empty.
Middle row: Place 3 cubes.
Back row: Place 2 cubes at the middle and right positions.
Place one more cube on each cube in the back row.
Number of cubes = 2 + 3 + 2 + 2 = 9.
For views (iv), (v) and (vi):
Make the bottom layer with 3 rows.
Front row: Place 1 cube at the left position.
Middle row: Place 2 cubes.
Back row: Place 2 cubes.
Place one more cube on each cube in the back row.
Number of cubes = 1 + 2 + 2 + 2 = 7.
For views (vii), (viii) and (ix):
Start with the second solid. Place one more cube on the back-right stack.
The back-left stack is now 2 cubes high and the back-right stack is 3 cubes high.
Number of cubes = 7 + 1 = 8.
5. Find the number of cubes in this stack of identical cubes.

Answer:
Count the cubes layer by layer, including the cubes hidden behind the visible ones.
Bottom layer = 4 + 3 + 2 + 1 = 10 cubes.
Second layer = 3 + 2 + 1 = 6 cubes.
Third layer = 2 + 1 = 3 cubes.
Top layer = 1 cube.
Total number of cubes = 10 + 6 + 3 + 1
= 20.
Therefore, the stack contains 20 cubes.
6. What are the different shapes the projection of a cube can make under different orientations?
Answer:
The projection of a cube can be a square, a rectangle or a hexagon.
(i) Square: Keep one face of the cube parallel to the projection plane.
(ii) Rectangle: Keep one edge parallel to the plane and turn the cube so that two faces are seen.
(iii) Hexagon: Tilt the cube so that three faces are seen. The hexagon may be regular or irregular. When the cube is balanced on a corner with the three meeting edges equally inclined, its isometric projection is a regular hexagon.

Get here the Solutions and Answers of Figure it Out at Page 100.
Page 100 – Figure it Out
1. In addition to the 5 ways shown in Fig. 4.8, are there any additional ways of gluing four cubes together along faces? Can you visualise and draw these as well?
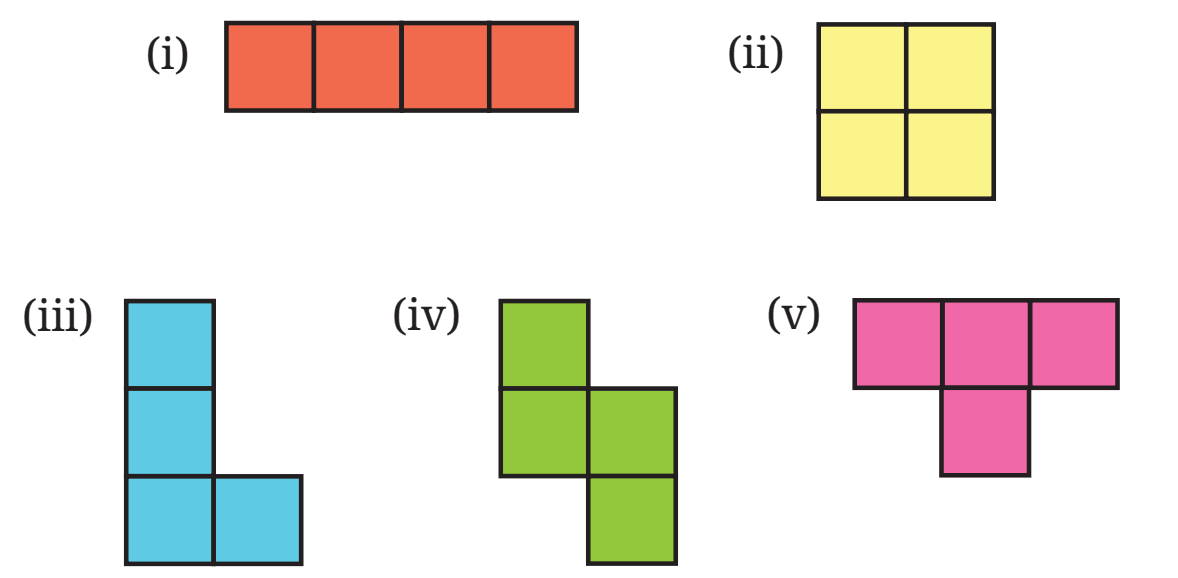
Answer:
Yes. Four cubes can also be joined so that they do not all lie in a single flat layer.
Three additional arrangements are shown below.
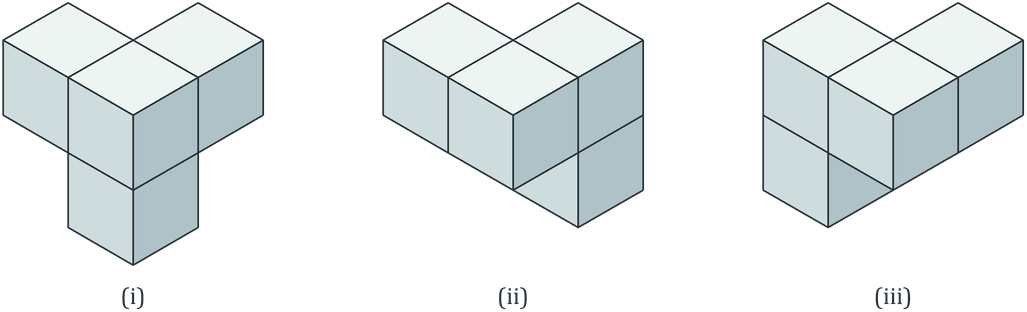
(i) One cube is joined to the other three cubes on three mutually perpendicular faces.
(ii) Three cubes form an L in the upper layer. The fourth cube is joined below one end of the L.
(iii) Three cubes again form an L in the upper layer. The fourth cube is joined below its other end.
The last two arrangements are mirror images. They cannot be made to coincide just by turning the solid.
2. Draw the following figures on the isometric grid.
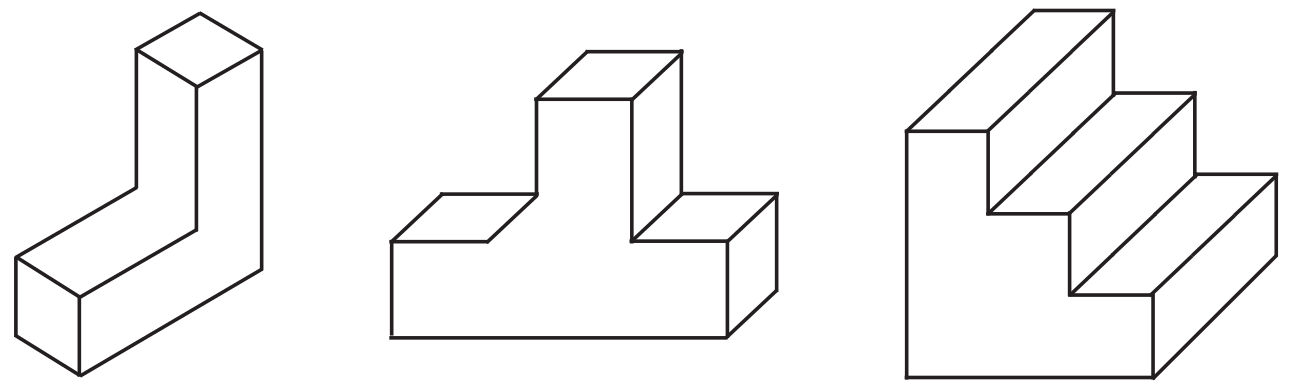
[Hint: It may be useful to determine whether the edge to be currently drawn – say, along the height – goes from down to up or up to down. Accordingly, draw the line segment on the grid either in the direction of the height axis or opposite to it.]
Answer:
The three figures on an isometric grid are shown below, in the same order.
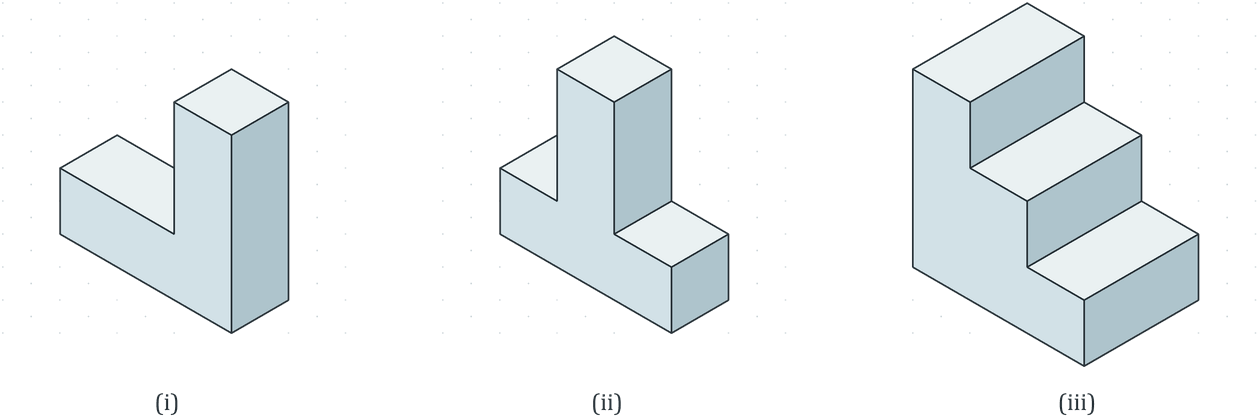
Edges in each of the three main directions are drawn parallel to one another. Equal lengths along these directions are shown by equal distances on the grid.
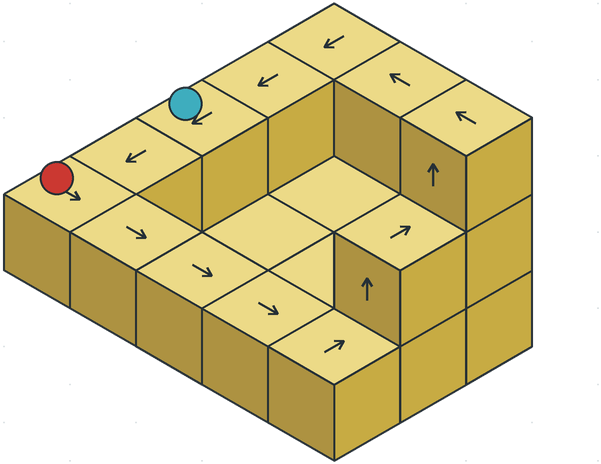
3. Is there anything strange about the path of this ball? Recreate it on the isometric grid.

[Hint: Consider a portion of this figure that is physically realisable and identify the 3 primary directions.]
Answer:
Yes. Following the arrows, the ball seems to move along level surfaces and climb two steps. It then returns to its starting point without coming down anywhere.
This is impossible for a real closed path. After climbing, the ball must come down by the same height to return to its starting point. The drawing joins parts that look possible separately, but their heights do not agree when we follow the whole path.
The path recreated on an isometric grid is shown below.
4. Observe this triangle.

(i) Would it be possible to build a model out of actual cubes? What are the front, top, and side profiles of this impossible triangle?
(ii) Recreate this on an isometric grid.
(iii) Why does the illusion work?
Answer:
(i) No. We cannot join actual cubes to make the whole triangle exactly as shown. Each corner looks possible by itself, but all three corners cannot be joined in this way in a real solid.
So, it does not have a consistent set of front, top and side profiles of one actual solid. If we follow one part to decide its height and position, another part gives a different result.
(ii) The triangle recreated on an isometric grid is shown below.
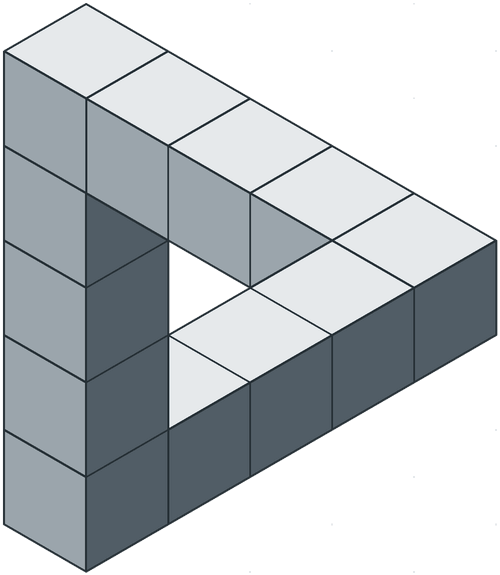
(iii) The edges follow the three directions used in isometric drawings. The shading also makes the small parts look like cubes. Our eyes take these parts to be one joined solid, even though their positions do not agree around the whole triangle. This makes the flat drawing look like an impossible solid.
Hands-On Practice for Nets, Views and Shortest Paths
Picture each cube net folding up, then cut it out to check, as the book suggests and build cube stacks with blocks or dice before drawing their views. For the ant-and-laddu puzzles, try several unfoldings of the cuboid, since the shortest path depends on it; its length then comes from the Baudhayana-Pythagoras theorem of Chapter 2. Many questions have more than one right answer, so if your sketch differs from these Exploring Some Geometric Themes Class 8 solutions, check whether it still satisfies the question. Chapter 5, Tales by Dots and Lines, comes next and every chapter is listed on our NCERT Solutions for Class 8 Maths page.